Get up and running with Split
Install Split, create your first A/B test inside the Webflow Designer, track conversions, and read results with honest statistics. No code required.
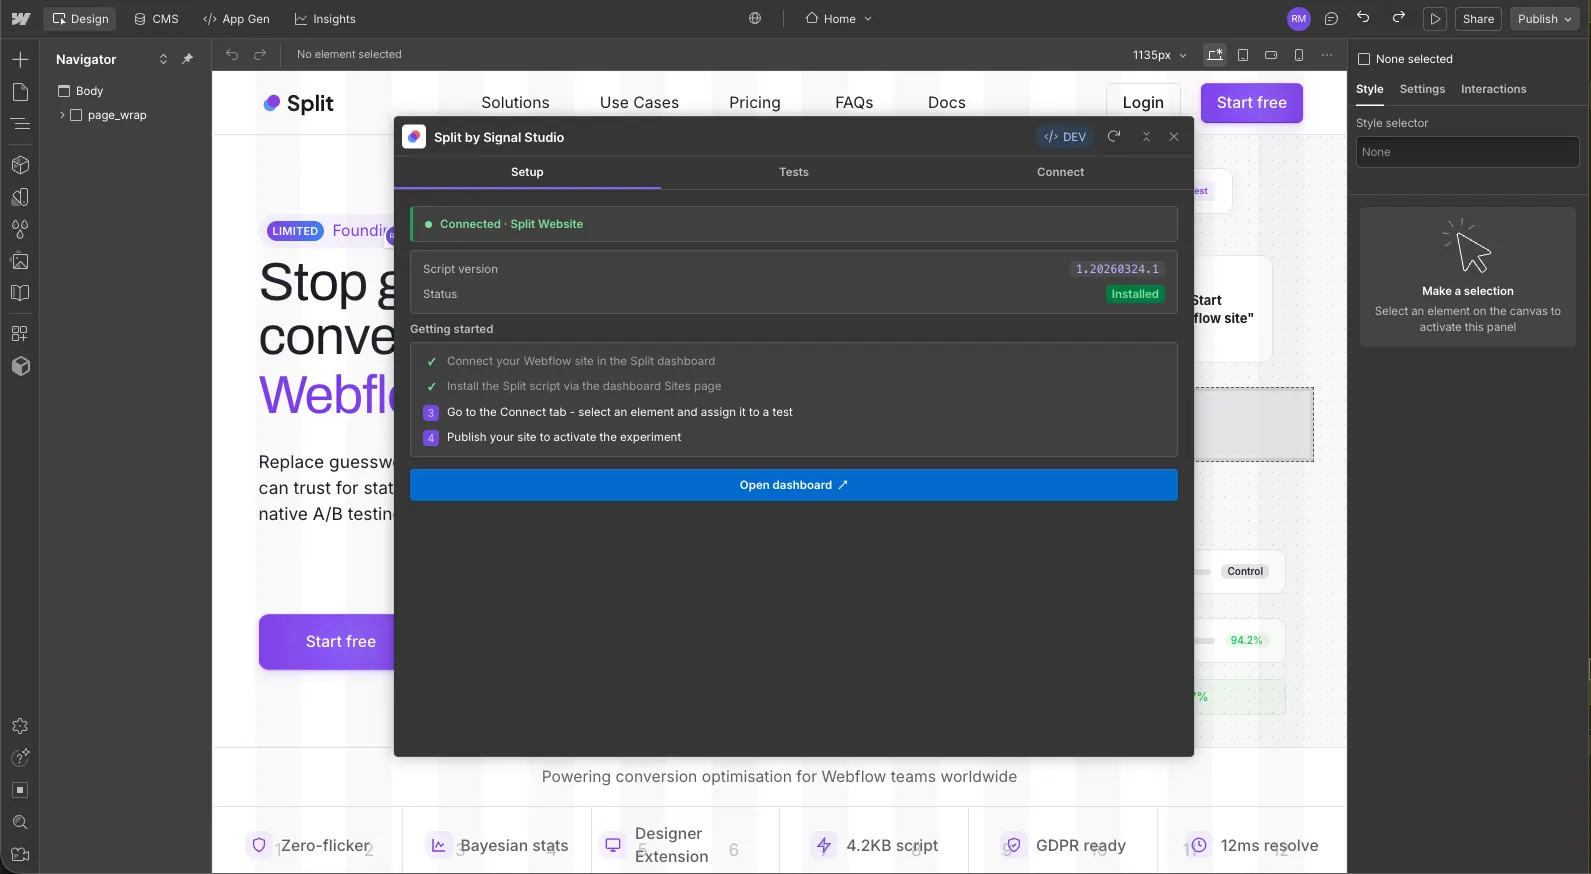
Getting started
Connect your Webflow site to Split in under two minutes. No copy-paste, no custom code, no developer required.
Sign up for Split
Head to app.withsplit.com and create a free account with your email. Free accounts include one running test at a time, so you can try Split end-to-end before upgrading.
Connect your Webflow site
From the dashboard, click Connect Webflow site. You'll be redirected to Webflow's OAuth authorize screen, where you pick the site you want to test on and approve Split. As soon as the connection completes, Split registers
split.jsas a Custom Code entry on your site automatically via Webflow's API - there's nothing to copy-paste, and the script is cached on a CDN so it adds roughly 8 KB to your page weight.
Publish your Webflow site
Custom Code only ships to visitors once you publish. Hit Publish in the Webflow Designer and Split's script goes live on your production domain. You'll need to republish every time you create a new test or edit a variant - see the FAQ for why.
You're set up. Now open the Webflow Designer and build your first test.
Creating your first A/B test
Tests are built inside the Webflow Designer using the Split Designer Extension. You pick an element, create a variant, and Split handles the rest.
Dashboard alternative: you can also create a test shell from app.withsplit.com (name, test key, traffic %, goals). You'll still need to open the Designer Extension to connect the actual Webflow elements to each variant - that part can't happen outside the canvas.
Open the Split extension in the Designer
Open your site in the Webflow Designer, click the Apps panel on the left, and launch Split. The extension opens in a side panel alongside the canvas.
Create a test
In the Tests tab, click New test. Give it a readable name (e.g. Hero headline v1), a Split Test Key (e.g.
hero-headline), optionally restrict it to a specific page URL pattern (e.g./pricing*), and choose a traffic percentage. Traffic percentage controls what share of visitors are included in the test - visitors outside the bucket see the original.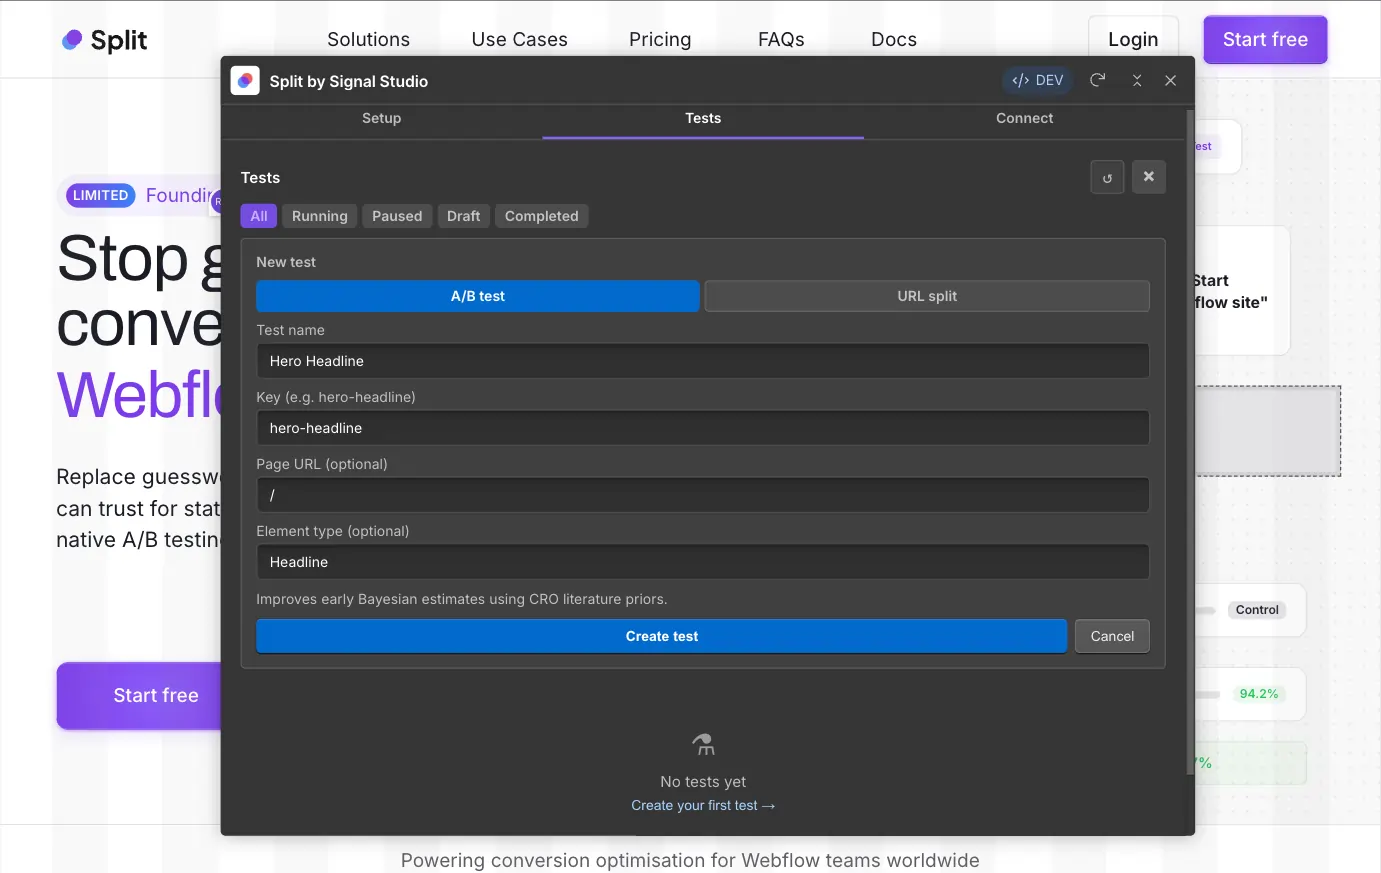
Connect the original element as Variant A
Open the Connect tab and select your new test. On the Webflow canvas, click the element you want to test (for example, your hero headline). In the extension, click Connect selected element as A. Split stores the element's Webflow ID and tags it as your control.
Building with Lumos, MAST, or another component-driven framework? See Testing component instances for the component-specific flow.

Build and connect Variant B
Duplicate the original element in Webflow, edit the copy or design however you like, then select the duplicate on the canvas and click Connect selected element as B. Both elements now live in your published HTML - Split removes the non-assigned one for each visitor before first paint.

Tip: You can preview either variant in the canvas using the A/B toggle at the top of the Connect tab, so you can design and check both sides without publishing.
Launch the test
Back in the Split dashboard, open the test and set its status to Running. Publish your Webflow site. Split's script picks up the new test on the next page load and begins deterministically assigning visitors to A or B. Same visitor always sees the same variant.

Creating a URL test
URL tests (sometimes called redirect tests) split traffic between two completely separate pages. Use them when you're testing entire layouts, full redesigns, or alternative checkout flows - anything where the change is bigger than swapping a single element.
URL tests are configured entirely in the Split dashboard. There's nothing to connect inside the Designer Extension because the variants are different pages, not different elements - split.js handles the redirect for you before the page renders.
Create the test in the dashboard
From app.withsplit.com, click New test and choose URL test. Fill in:
- Test name - a readable label (e.g. Pricing page redesign)
- Test ID - the machine key used in tracking events (e.g.
pricing-redesign) - Source URL - the page visitors land on, where the assignment is made (e.g.
/pricing). Wildcards are supported (e.g./pricing*) - Variant B redirect URL - where visitors assigned to B get sent (e.g.
/pricing-v2) - Traffic percentage - share of visitors included in the test (default 100%)

Build Variant B as a separate Webflow page
The redirect URL needs to point to a real, published page. Build it in Webflow as you normally would - duplicate the source page, edit the layout however you like, and publish to the same domain. Variant A stays on the source URL with no changes.
Same-origin only. Both URLs must live on the same domain. Cross-domain redirects are blocked - they'd break visitor identity (different
localStorageper origin) and most likely your analytics too.Publish your Webflow site and launch the test
Set the test status to Running in the dashboard, then publish your site. On the next visit to the source URL,
split.jspicks up the test, deterministically assigns the visitor to A or B, and either lets the page render (A) or callslocation.replace()to send them to the redirect URL (B) before the page paints. Same visitor always lands on the same variant on repeat visits.Open the Designer Extension (optional)
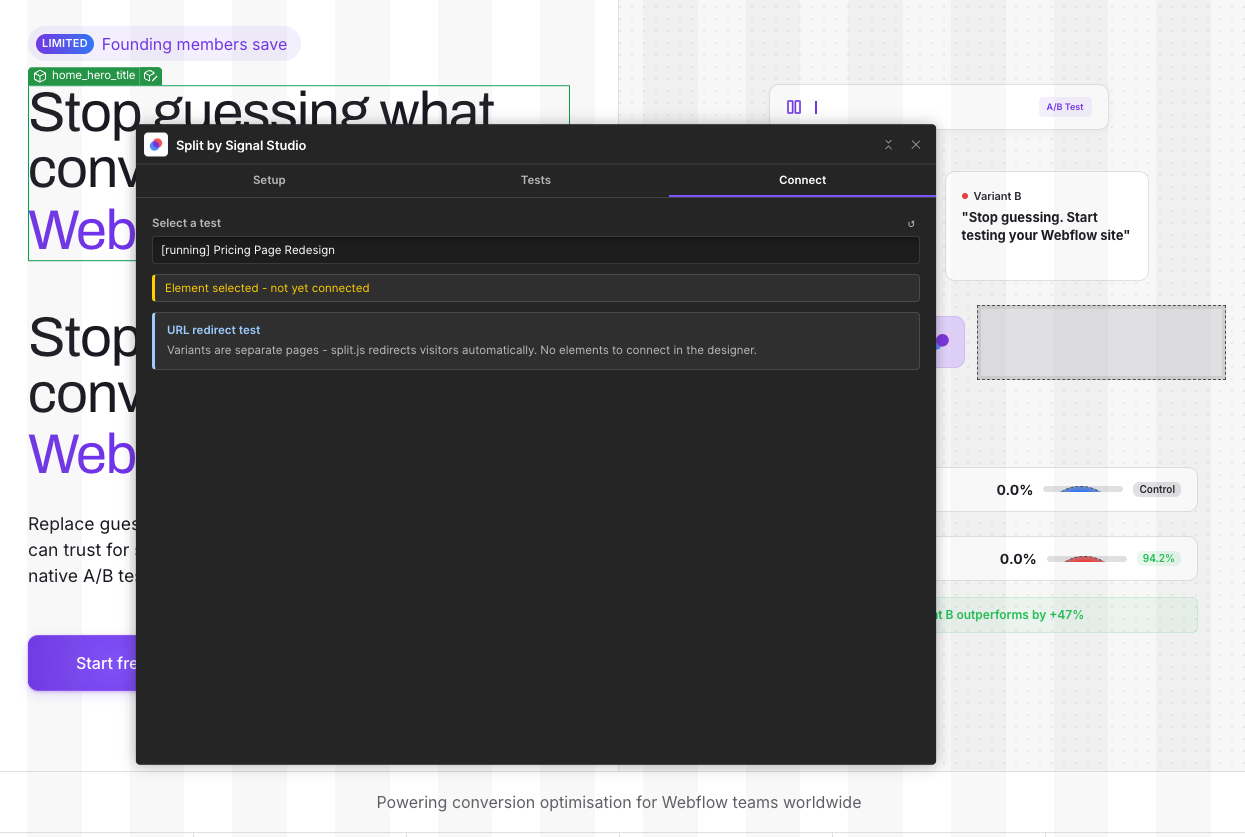
If you open Split's Connect tab while a URL test is selected, you'll see an info notice instead of the usual element-connect controls:
URL redirect test. Variants are separate pages -
split.jsredirects visitors automatically. No elements to connect in the Designer.You can still edit the redirect URL or traffic percentage from the test detail page in the dashboard at any time.
Goals on URL tests. Goals work the same as A/B - add a click, pageview, scroll-depth, or time-on-page goal from either page. A common pattern is a pageview goal on /thank-you after a form submit, which captures conversions regardless of which variant the visitor saw.
Creating a multivariate test
Multivariate tests (MVT) test multiple changes at once across multiple factors, each with its own levels. Split tries every combination and tells you which level of each factor performs best - so you can land winning copy and a winning layout in a single test instead of running them sequentially
Available on the Starter plan and above. The free plan supports A/B and URL tests; multivariate testing requires a paid plan because of the extra traffic each combination needs.
A simple example: testing a hero Headline (3 levels) and a CTA Button (2 levels) gives you 3 × 2 = 6 combinations. Split's stats engine ranks each factor independently and recommends the winning level per factor.
Create the test in the dashboard
From app.withsplit.com, click New test and choose Multivariate. Fill in name, test ID, and an optional page URL filter, then define your factors and levels:
- Factor - the thing you're varying (e.g. Headline, CTA Button, Hero image)
- Levels - the variations of that factor. Level 0 is always the control; add as many alternatives as you like
Choose your factorial type:
- Full factorial - tests every combination (2 × 2 = 4, 3 × 2 = 6, 3 × 3 × 3 = 27). More accurate per-factor data, more traffic needed
- Fractional factorial - tests an orthogonal subset (3 × 3 × 3 collapses to 9 combinations). Good when you have many factors but not enormous traffic

Start small. 2 factors with 2 levels each (4 combinations) is the recommended starting point - the dashboard shows an estimate like ~30 days to 100 visitors per combination based on your current traffic so you can plan for it.
Connect each level to an element in the Designer Extension
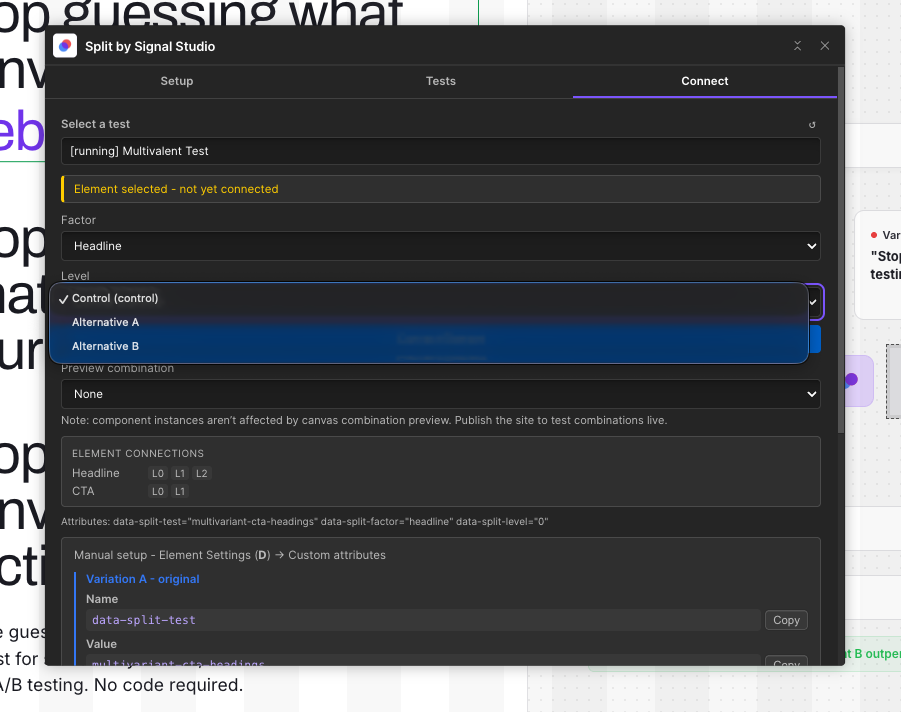
Open Split in the Webflow Designer and switch to the Connect tab. With your MVT test selected you'll see a factor/level matrix - a row per factor with a dropdown of its levels. For each level (including the control):
- Select the level from the dropdown
- Click the element on the Webflow canvas that represents that level
- Click Connect
Split tags the element with
data-split-factoranddata-split-levelattributes. Repeat for every level of every factor. Building with Lumos, MAST, or another component framework? Connecting component instances works the same way - see Testing component instances.Publish and launch
Set the test to Running in the dashboard and publish your Webflow site. On each page load,
split.jshashes the visitor ID into a combination, removes elements that don't match the assigned levels (so the visitor only ever sees one combination), and tracks impressions and goals against the combination ID. Same deterministic assignment as A/B - same visitor sees the same combination on every visit.
Reading MVT results. The MVT test detail page shows a What to change decision card that ranks factors by impact (High, Moderate, Low), recommends the winning level for each, and surfaces the single best-performing combination. See Reading results for how Split decides when a recommendation is statistically meaningful.

Testing component instances
Connect Webflow component instances directly to A/B tests, multivariate tests, URL tests, and conversion goals - no Div Block wrapper required. This is the flow to use if your site is built with Lumos, MAST, or any other component-driven framework.
Available in Split Designer Extension v1.0.4 and later. Split uses Webflow's Component Properties API to add typed props to your component definition, binds them to data-split-* attributes on the component root, then sets per-instance values whenever you connect a test or goal.
Select the component instance on the canvas

Open your site in the Webflow Designer and click the component instance you want to test. Split's panel detects it as a ComponentInstance and updates the Connect tab accordingly. Nested components are fine - select the outermost instance you want to vary.
Pick your test or goal in the Split panel
Pick your test or goal in the Split panelSame Connect tab as the element-based flow. Pick the test (A/B, MVT, or URL) or expand the goals section, then click Connect. Each test type binds a different combination of props on the component:
- A/B test - adds
splitTest+splitVariant - Multivariate test - adds
splitTest+splitFactor+splitLevel - URL test - adds
splitTest+splitVariant(Split's runtime handles the redirect) - Goal element - adds
splitGoal
- A/B test - adds
Confirm the first-time setup modal
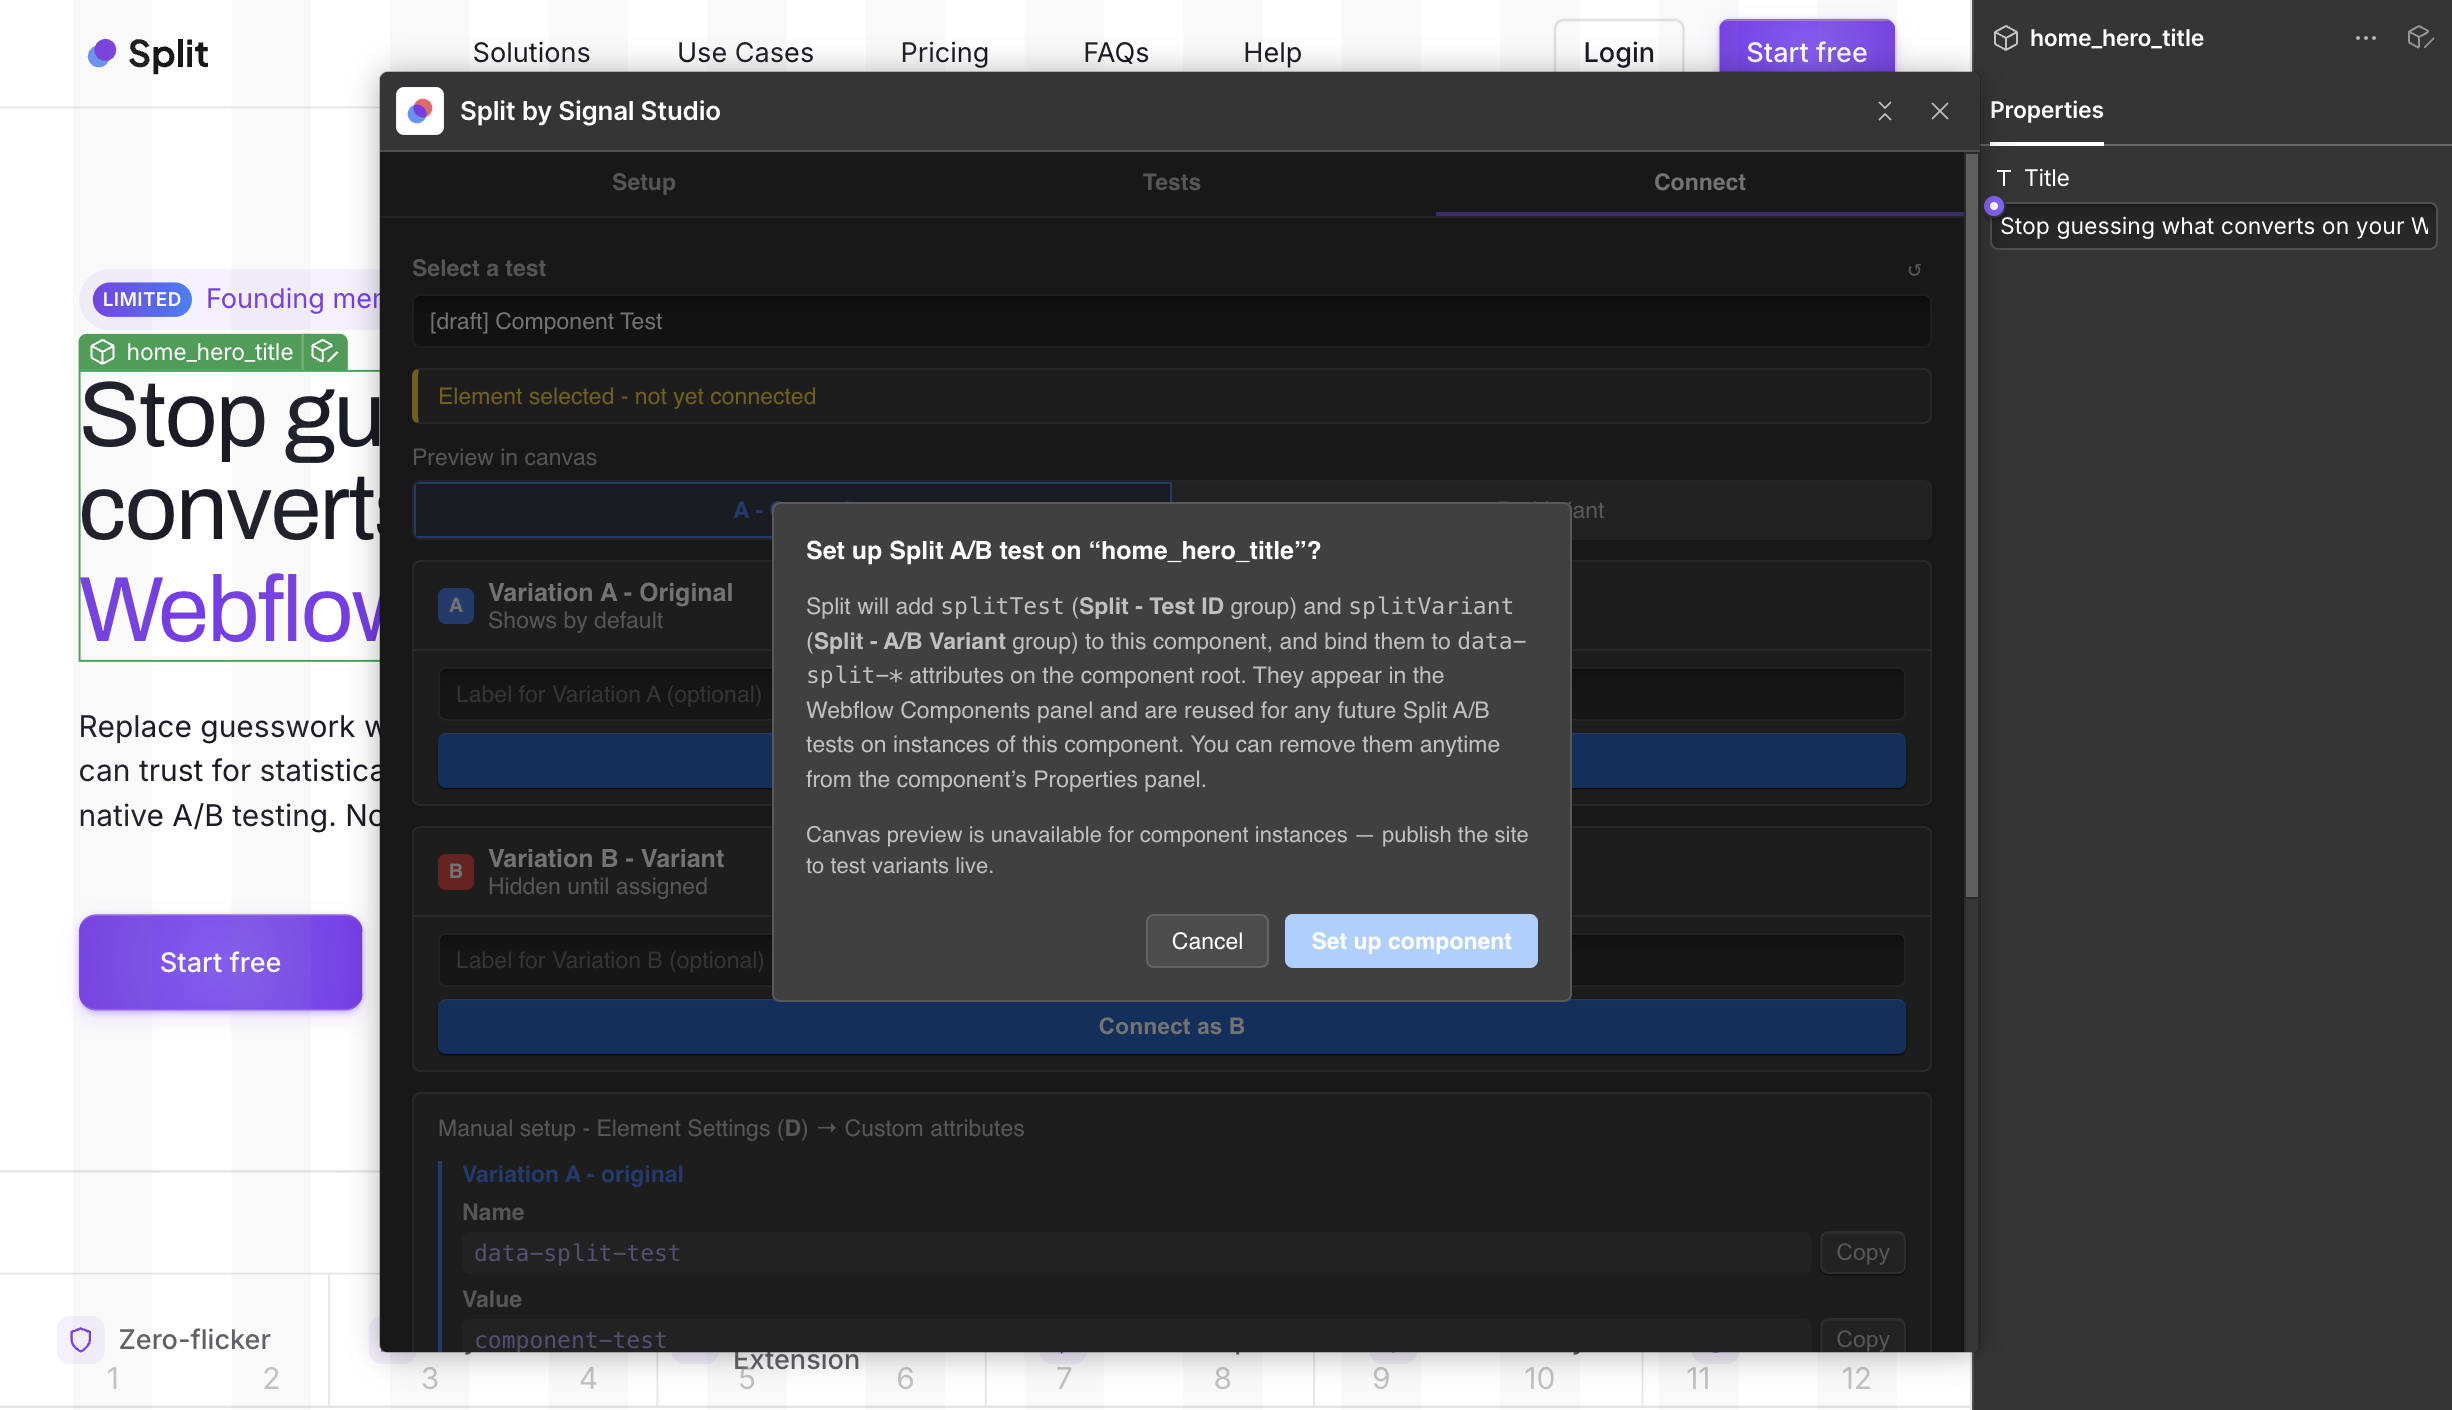
The first time you connect any instance of a given component, Split shows a confirmation modal explaining exactly what it's about to add to the component definition. For an A/B test it reads:
Set up Split A/B test on "ComponentName"? Split will add
splitTest(Split - Test ID group) andsplitVariant(Split - A/B Variant group) to this component, and bind them todata-split-*attributes on the component root. They appear in the Webflow Components panel and are reused for any future Split tests on instances of this component. You can remove them anytime from the Properties panel.Click Set up component to confirm. Reconnecting on a component that's already set up reuses the existing props - no duplicates, no extra modal.
Done - props appear in the Components panel
Open the component in Webflow's Components panel and you'll see the new props grouped under clearly named headings:
- Split - Test ID - holds
splitTest - Split - A/B Variant - holds
splitVariant(A/B and URL tests) - Split - Multi Variant - holds
splitFactorandsplitLevel(MVT tests) - Split - Goal - holds
splitGoal(goal elements)
Each connected instance carries its own per-instance values, so different instances of the same component can run completely independent tests. When you publish, every connected instance renders with the correct
data-split-*attributes baked into the HTML, andsplit.jsreads them via standard DOM APIs - no script changes, no extra setup.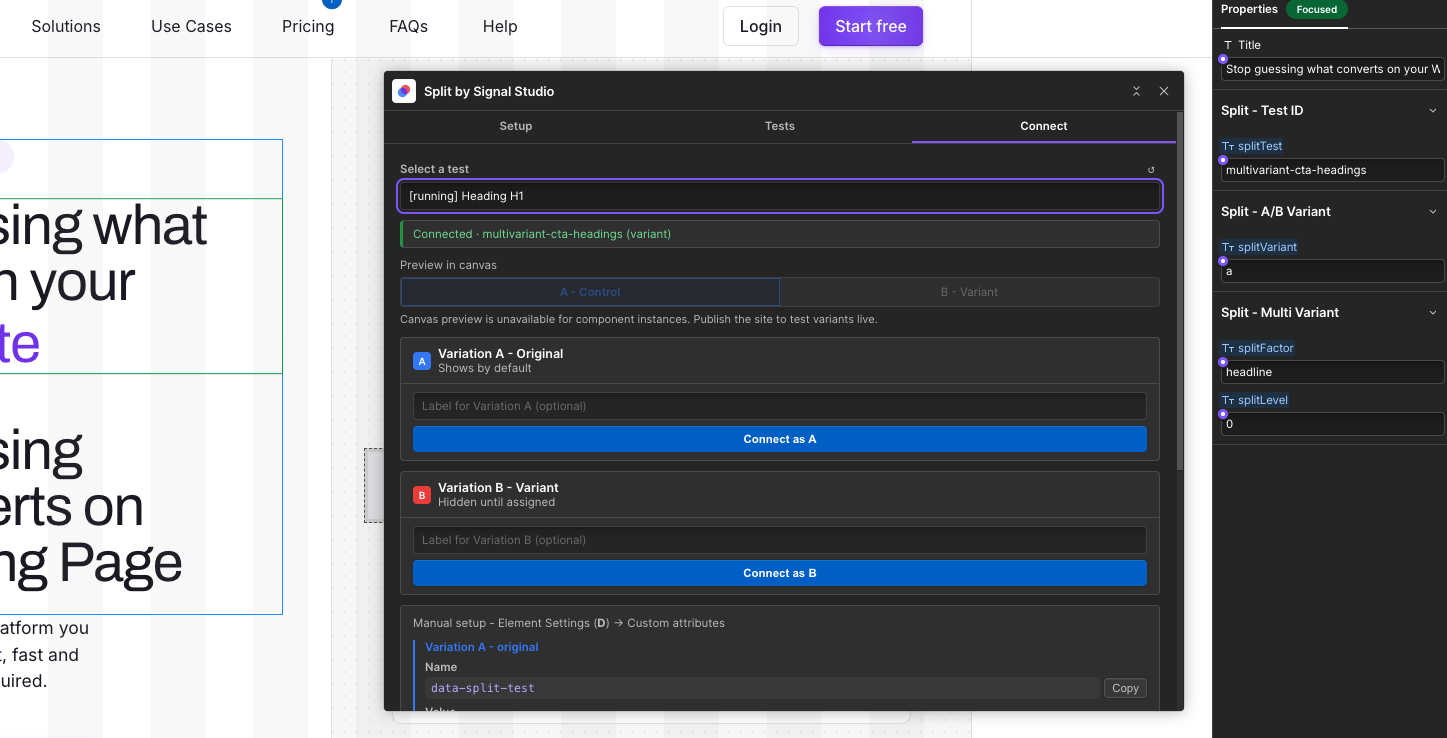
- Split - Test ID - holds
Canvas preview is unavailable for component instances. Webflow's API doesn't permit extensions to write inline styles on component instances, so the in-canvas A/B preview toggle is disabled for connected components. To preview variants, publish to staging and append ?split_force=<test-key>:a or ?split_force=<test-key>:b to the published URL. Element-based connections (Div Blocks, Sections, Buttons) still support the canvas toggle as before.
Removing the props. To disconnect a component from Split, open it in the Components panel and delete the Split - * prop groups from the Properties panel. Instances of that component will no longer carry the data-split-* attributes when published. Reconnecting via Split later recreates the props automatically.
Setting up goals
Goals are the conversion events Split counts per variant. Add as many as you like per test — one is marked Primary and drives the winner banner.
You can add goals from the Connect tab in the Designer Extension (the fastest way, since you can click elements directly on the canvas) or from the test detail page on the dashboard.
Click
Fires when a visitor clicks a selected element. Connect any Webflow element on the canvas, or paste a CSS selector as a fallback. Great for CTAs and any clickable element you want to track.
Pageview
Fires when a visitor lands on a URL that matches your pattern (e.g. /thank-you). Perfect for form submissions, checkout completions, and any flow that ends on a success page.
Scroll depth
Fires when the visitor scrolls past a percentage of the page (1–100). Useful for measuring engagement on long-form landing pages and blog posts.
Time on page
Fires after a visitor has spent N seconds on the page. Good proxy for attention when you don't have a concrete click or pageview conversion to track.
Form submit
Fires when a visitor successfully submits a Webflow form on the page. Connect the Form Block (or the inner Form) on the canvas, Split watches the form's success state and credits the visitor's variant automatically. Works with native Webflow forms and falls back to any custom HTML form on the page.
Primary goal: every test needs a primary goal. It's what Split uses to calculate significance and pick the winner. Secondary goals are tracked alongside, so you can see whether a lift in clicks also lifts (or drops) sign-ups.
Reading results
Split's dashboard shows you exactly what's happening in each variant and when it's safe to call a winner.
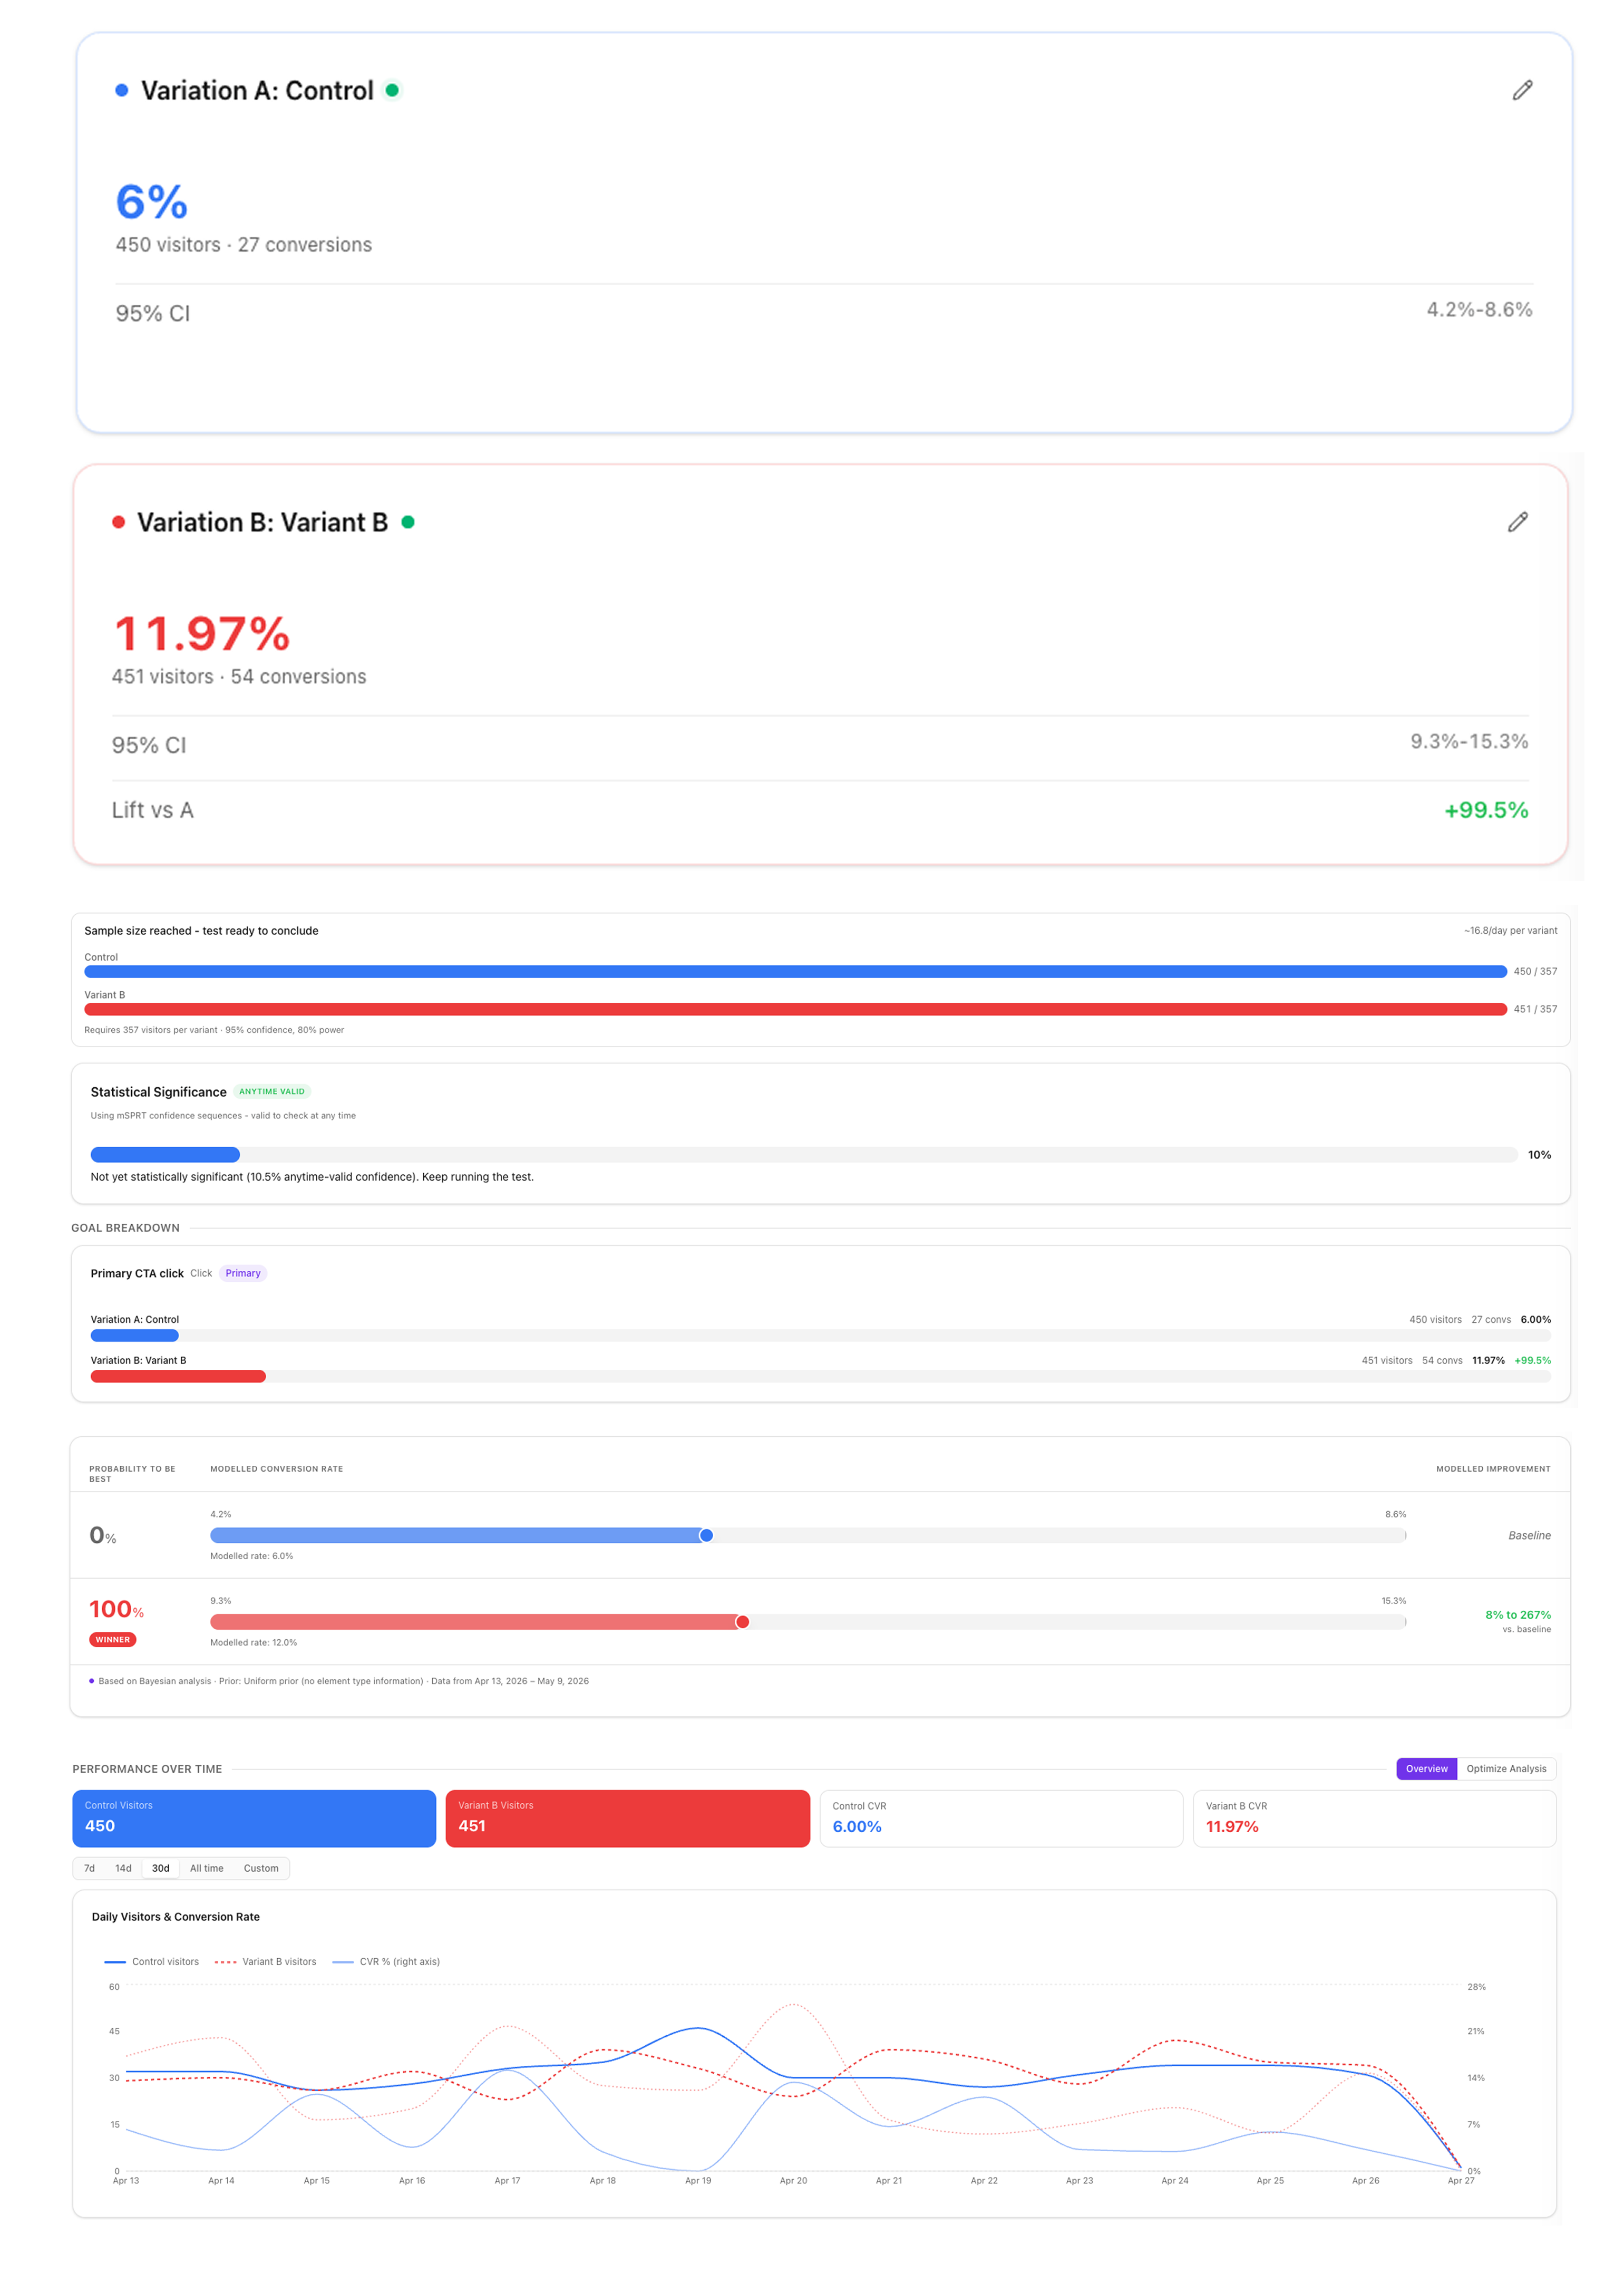
Variant cards
Each variant gets a card showing unique visitors exposed, unique conversions, conversion rate, and lift vs Variant A. Visitor counts are deduplicated by visitor_id, so repeat traffic doesn't inflate numbers.
Statistical significance
Split uses a chi-square test against the primary goal. Below 90% confidence: keep collecting data. 90–95%: promising, not conclusive. At or above 95%: significant, and the winner banner appears. You also need a minimum of 100 visitors per variant before the number is meaningful — fewer than that and the result isn't robust enough to act on.
Per-goal breakdown
A horizontal bar chart for every goal on the test (not just the primary) shows A vs B conversion rates side by side with the lift percentage. Quickly spot cases where B lifts your primary goal but drops a secondary one.
Configuration
Every test page includes its current traffic percentage, URL filter, start date, and exposure trigger (immediate counts everyone who loads the page; viewport only counts visitors who actually scroll the variant into view).
Honest stats by default. Split only calls a winner at 95% confidence or higher, with at least 100 visitors per variant. We don't inflate the number, and we don't show you a winner until the data can back it up.
Frequently asked questions
The questions we hear most from new Split users. If yours isn't answered here, email us at support@withsplit.com.
Split's script and variant HTML only run on your published domain, not on Webflow's webflow.io staging domain. Every change in the Designer - creating a test, connecting a new variant element, updating the script - needs a publish to go live.
Think of it like any other Webflow change: editing in the Designer is just a draft until you hit Publish.
Split stores each visitor's assignment in localStorage under the key split_variants. If a visitor clears their storage (or opens your site in a fresh incognito window), they get a new anonymous visitor ID and a fresh assignment. That may put them in a different variant than before.
Because the assignment is a deterministic FNV-1a hash of visitorId + testKey, the split is still evenly balanced across your audience overall, so it doesn't bias your results - it just means individual visitors can swap sides if they reset their browser.
Yes. Because split.js is registered as site-wide Custom Code in Webflow, it loads on every page of your published site, including gated ones. Split doesn't care whether the page is behind a paywall or login - it just reads the data-split-test attributes on elements in the DOM and serves the assigned variant.
If your paywall is enforced client-side by hiding content after load, just make sure the Split variant elements are the ones shown to authenticated visitors.
No. Split uses DOM removal (el.remove()), not display: none, to drop the non-assigned variant before first paint. Search crawlers only ever see one version of each element per visit, so there's no duplicate content or hidden-text penalty.
No. Split injects a synchronous script that runs before the HTML parser reaches your variant elements. For returning visitors, cached assignments from localStorage apply instantly. For new visitors, a visibility: hidden style hides variant elements for the short window (usually under 50 ms) it takes to fetch the test config and assign a variant. Nothing flashes on screen either way.
Append a query parameter to the URL: ?split_force=yourTestKey:a or ?split_force=yourTestKey:b. Split serves the forced variant to you without writing a tracking event, so your preview traffic doesn't pollute results.
Yes. Each test is keyed by its own split_test_key, and assignment is independent per test. A single visitor can be in A for one test and B for another, on the same page, with no interference.
Yes. As of v1.0.4 the Split Designer Extension can connect Webflow component instances directly to A/B tests, multivariate tests, URL tests, and conversion goals - no Div Block wrapper required. Split adds typed props to the component definition via Webflow's Component Properties API and binds them to data-split-* attributes on the component root, so component-driven frameworks like Lumos and MAST work end-to-end.
See Testing component instances for the full flow.
Webflow's Designer API doesn't permit extensions to write inline styles on component instances, which is what powers the in-canvas A↔B preview toggle for element-based connections. The toggle stays available for any element-based connection (Div Block, Section, Button, etc.).
To preview variants of a connected component instance, publish to staging and append ?split_force=<test-key>:a or ?split_force=<test-key>:b to the published URL. Split serves the forced variant without writing a tracking event.
Contact
Stuck on something, hit a bug, or want to request a feature? We're a small team and we read every message.
Email support
Reach us at support@withsplit.com. We aim to respond within one business day (New Zealand time).
Go to contact page